µPhase®
Interferometer for measurements of the surface and wavefront deformation
Highly precise
Multipurpose
Reliable
Products
µPhase® interferometers are very compact, small and lightweight digital devices that can be used in almost any work environment. With support from the µShape software, extensive measurement analyses can be performed. The µPhase® sensor is the basis for interferometry measurements at TRIOPTICS. The sensor is modular and can be configured with various measurement diameters and stands for specific measurement tasks. In addition, customized solutions can be offered at low cost.

µPhase® 3.1/3.2/3.3.
Highly flexible
The Twyman Green interferometer sensor µPhase® is available in identical designs for different resolutions and can be integrated into your setup.
- Focusing and adjustment of surface reflectivity is possible (µPhase® 3.3 only)
- Integration in manufacturing machines and production lines is possible

µPhase® VERTICAL 3
Versatile
Highly flexible and fully equipped interferometer system for manufacturing, workshops and laboratories.
- Motorized vertical Z-axis
- Unique design for all types of reflection and transmission measurements
- Integrated automatic radius measurement
- Compact design with vertical measurement structure for small spaces
- Optimal sample alignment due to integrated tilt and X-Y translation table
- Modular design for optimization based on measurement requirements
- Optional: Use of a tray holder and a motorized X-Y carriage for the automatic surface and radius measurement of many samples in one pass

µPhase® VERTICAL PRO
Automation
With its tray, the µPhase® VERTICAL PRO can automatically measure 20 to 30 samples.
- Measurement of spherical, torical and aspherical lenses as well as samples made out of glass, plastik or metal
- Highest accuracy for sample radii up to 50 mm
- Freely configurable and quickly exchangeable sample holder

µPhase® PLANO DOWN
Compact structure
µPhase® PLANO DOWN with its compact design is suitable for the measurement of flat components in research and development as well as in production.
- Measurement range for diameters of up to 150 mm
- Samples are placed on the granite plate and measured from the top
- Vibration insulation is usually not required since the unit has a solid granite base
- Compact design and small footprint
- Easy handling due to height-adjustable columns
- Can also be used by untrained personnel due to its intuitive and easy handling

µPhase® PLANO UP
Plan lenses in production
For a cost-efficient quality control of optical flat surfaces in production µPhase® PLANO UP is the perfect choice.
- Measurement range for diameters of up to 100 mm
- Compact design for small spaces, can be placed right next to the production machine
- Samples are positioned at the top of the unit on a ring chuck or three-point support and measured from below
- Vibration resistant
- No intermediate realignment is required for serial measurements
- Can also be used by untrained personnel due to its intuitive and easy handling

µPhase® SPHERO UP
Spheres in production
Spherical surfaces can be controlled fast and cost-effectively in production with the µPhase® SPHERO UP.
- Measurement range for diameters of up to 50 mm
- Compact design for small spaces, can be placed right next to the production machine
- Samples are positioned at the top of the unit on a ring chuck or three-point support and measured from below
- Vibration resistant
- No intermediate realignment is required for serial measurements
- Can also be used by untrained personnel due to its intuitive and easy handling

µPhase® ST/ST+R
Flexible and cost-efficient
µPhase® ST/ST+R can be used flexibly and cost-effectively in research and development as well as in production.
- Measurement of flat and spherical samples
- Compact table top stand for vertical measurements with small footprint
- Optimal sample alignment with integrated tip/tilt and xy translation stage
- Vertical axis with rough and fine regulation for high-precision adjustment
- Optional: digital measurement unit for radius

µPhase® UNIVERSAL
Highest variability
Due to its multi-purpose structure and modular design µPhase® UNIVERSAL offers highest variability in research and development
- 2, 4 or 6-inch measurement system for the testing of flat and spherical surfaces
- Horizontal structure for the measurement of long radii
- Compatible with other conventional 4-inch lenses
- Optional CGH bracket for the measurement of aspheres, cylinders or toric surfaces
- MTF and homogeneity measurements on request

µPhase® Customized Solutions
Application specific development
Its modular structure and compact design make the µPhase® a highly versatile interferometer – even beyond usual measurement requirements.
- Customized solutions for special applications can be implemented based on standard components
- Development of additional customized components and software modules
Software
µShape
Interferometer Software
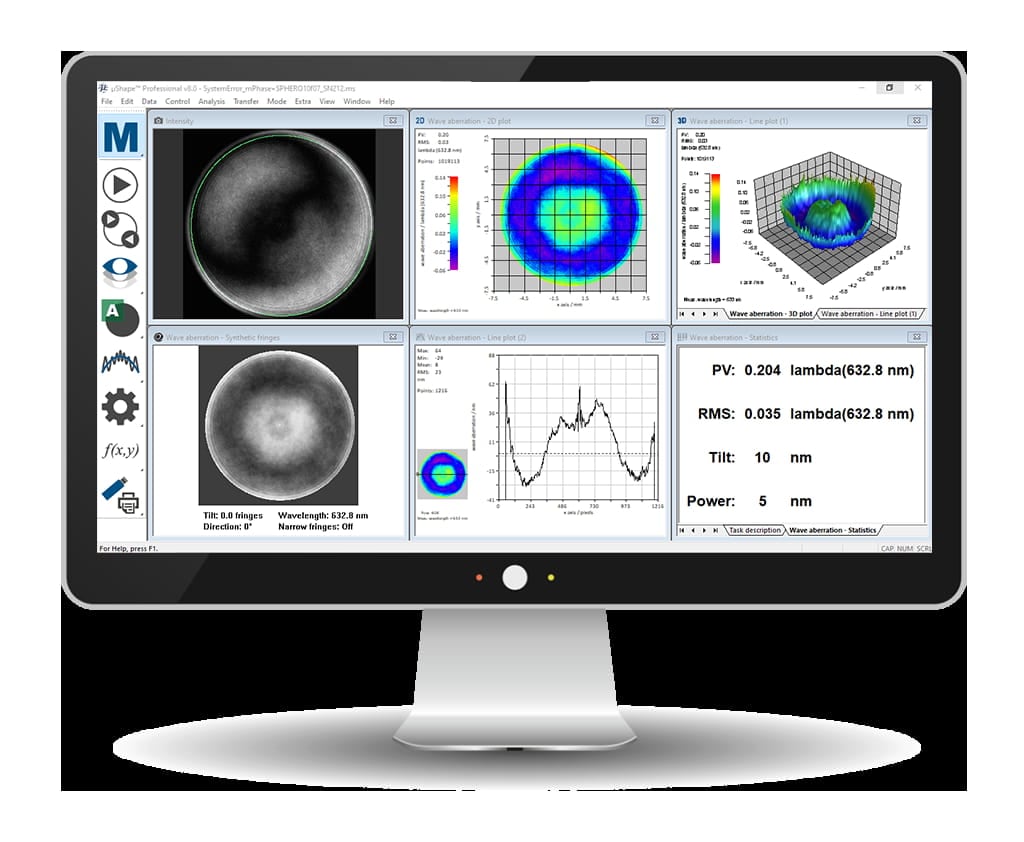
With the freely configurable µShape software in the current version 8, µPhase® is ideally equipped for use in both production as well as research and development. The software controls the measurement, provides comprehensive options for analysis and offers full documentation. Measurement templates provide maximum transparency about the measurement process and permit the quick documentation of test results.
The clearly structured, menu-based user interface of µShape always complies with the comprehensive use of µPhase® and can be expanded in many different ways via the available modules. These modules can be added at any time, even after purchasing the µPhase® system.
The µShape software was developed primarily for µPhase® operation but can also be used for operating laboratory and workshop interferometers from other manufacturers. The development of customized functions is possible.
- Various access levels allow user-specific access options, from the administrator to the production user
- Comprehensive, context-specific direct help
- Easy to use and less training needed for users due to easily configurable templates for any type of measurement task and analysis
- Comfortable reanalysis option of saved measurements without re-measuring
- Easy storage of graphics in various graphics formats (bmp, jpg, etc.)
- Fast data export of single parameters or selected data fields as text files, binary files or other commonly used file formats (e.g. QED, Zygo XYZ, DigitalSurf, INT) for external processing
- MetroPro compatible file format extended with sample parameters from the task description
- An additional 2-dimensional polynomial fit
- The measurement report provides a comprehensive presentation of results and can be configured in a variety of ways, including customer logos
- Clearly structured presentation of the program modes by separate visualization of calibration and measurement processes
- Comprehensive presentation of measurement parameters as measured values, in graphic 2D or 3D or freely selectable sectional graphics (1D) including integrated live camera images
- Fast measurement of repetitive parts by storing all parameters and settings including the window size and position, with sample files in a µShape program file
- Flexible and custom screen display that adapts to any monitor size
- Live image: display on 2nd screen as an additional window
- Always the latest technology through continuous development and regular updates – on request or as a software flat rate
- Fully compatible with Windows 10 (64-bit and 32-bit systems)
“Aspheres”: Aspheric analysis in spherical or CGH setups
- The asphere module permits the analysis of strong aspheres in an aspherical setup with the help of a computer-generated hologram (CGH) as well as the analysis of weak aspheres in spherical setups. A description of the asphere can be entered and saved. Various formats (rotationally symmetric) are supported. Remaining adjustment errors as well as systematic setup errors are compensated by an aspherical adjustment fit.
“Cylinder”: Cylinder analysis
- The cylinder module analyzes cylindrical samples in a cylindrical setup (with CGH). Remaining adjustment errors are compensated by a cylindrical adjustment fit.
“Extern Interface“: External communication interface
- The external interface module allows communication between µShape™ and external software such as LabVIEW™ for controlling the interferometer through external programs, e.g. within an automated system
“FastFringe“: Static fringe analysis
- This module enables the analysis of a single interferogram for measurements in instable environments or with interferometers without phase shifting device.
“Fiber connector“: Fiber optic connector analysis
- The fiber connector module allows the analysis of the end faces of fiber optic connections type PC (physical contact) as per the international IEC convention. The main parameters are gathered with just one measurement; this includes an optional display of a pass/fail analysis.
“Homogeneity“: Measurement of the homogeneity of transparent samples
- Both aspects influencing the optical path through the sample, i.e. homogeneity (variation of the refractive index) on the one hand, and thickness variation on the other hand, can be determined in a separate program mode.
“Math Mode”: Mathematic mode
- This program mode permits the analysis of various data assignments in combination with mathematical calculations to an additional assignment of results. Matrix calculations are not possible.
“Multiple apertures“: Multiple aperture analysis in one step
- This module permits the joint measurement and analysis of individual unconnected apertures within a field of view, e.g. for the measurement of components mounted on polishing heads.
The possibility of simultaneous measurement of non-connected apertures also enables a wedge analysis. This analysis can be used to determine the wedge angle of flat mirrors as well as the optical wedge of flat transfer plates with an additional mirror behind the object in one step.
“Multiple statistics“: Identical statistical analysis on multiple subapertures
- If the sample specification defines different limits for different sub-sections of the same sample, the MultiStat module allows identical analysis for all subareas within a single measurement. The results for each section are issued separately.
“MTF/PSF“: MTF analysis
- In the field of optics, MTF is used to describe the quality of optical systems. The module permits to calculate the MTF of focal and afocal optical components and systems
“Prisms“: Prism analysis
- Angular errors on 90° and triple prisms can be measured interferometrically by analyzing the interference patterns observed through error deviation on 90° or 0° target angles.
“Roughness / PSD”: Analysis of roughness and PSD
- This module allows to calculate the power spectral density (PSD) as well as roughness parameters along a freely definable straight line.
“Sample Normal Data“: Consideration of known sample deviations
- The use of sample data (Sample Normal Data – SND) allows the identification of additional sample errors and include them in testing, e.g. deviations due to the optical design (design-based nominal values).

Upgrades

- Replacement of the µPhase® sensor from µPhase®1 to µPhase®3.3 for a camera resolution increase from 608 x 608 pixels to 1216 x 1216 pixels
- Horizontal or vertical stands
The basic µPhase® units and flat lenses have a bayonet connection that permits quick and easy changes between various system structures. - Flat and spherical calibration surfaces with various diameters
-Uncoated
-Mirrored - License for offline analysis and documentation at office workstations without direct access to µPhase® hardware
µPhase® 3 XL with different wavelengths
The proven and highly integrated phase-shifting interferometer µPhase® 3 XL is modified to use with various wavelengths:
- supports blue, green and deep red light sources
- currently 405, 532 and 1064nm, other wavelengths on request
- standard version @ 633nm
- reflectivity adaption and object-plane focusing ability for all wavelengths
- same mechanical dimensions and interfaces of the sensor for all wavelength

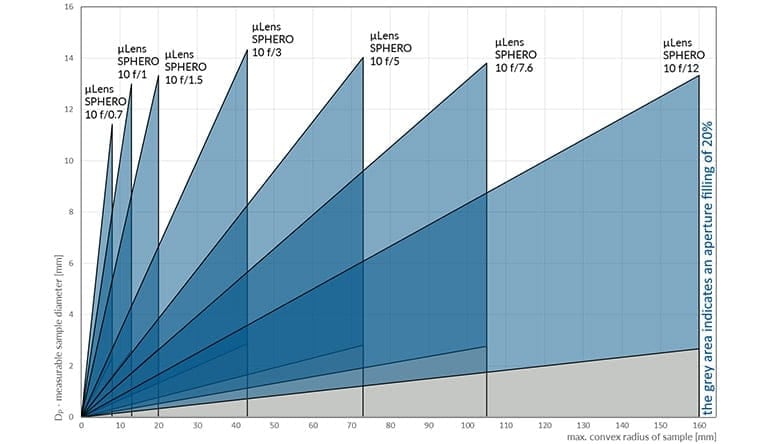
- µLens SPHERO 10 f/0,7
- µLens SPHERO 10 f/1
- µLens SPHERO 10 f/1,5
- µLens SPHERO 10 f/3
- µLens SPHERO 10 f/5,2
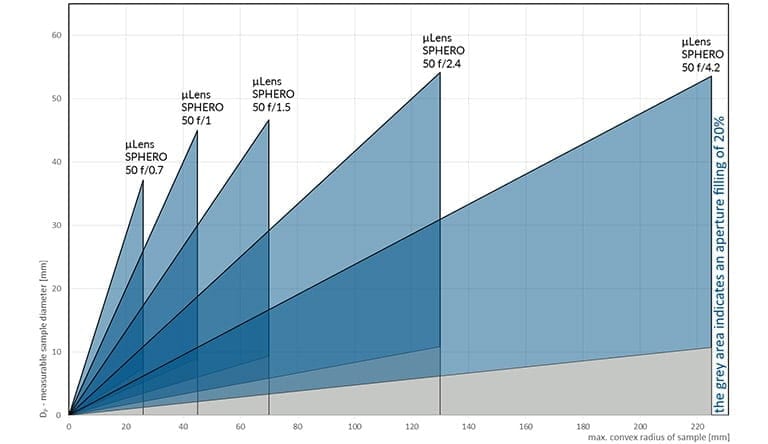
- µLens SPHERO 50 f/0,7
- µLens SPHERO 50 f/1
- µLens SPHERO 50 f/1,5
- µLens SPHERO 50 f/2,4
- µLens SPHERO 50 f/4,1

µLens SPHERO Objective in combination with µLens SPHERO 10

µLens SPHERO Objective in combination with µLens SPHERO 50
Partnership with InterOptics

OptoFlat
Specialist for flat optics
The short coherence interferometer OptoFlat is specialized in the measurement of flat optics.
- Production ready and research capable flatness interferometer with sub-nanometer precision
- LED illumination system minimizes coherent artifacts
- Hand-wave no-touch sensor starts measurement without keyboard inputs

Are you interested in a product and would like to receive a quote?
Whether you need advice or already have specific requirements, we will be happy to help you!
Use our contact form and get quick feedback from our experts.Our Newsletter – Your advantage in knowledge
Be one of the first to experience our product novelties and innovative application possibilities.


